tiny house seasons: year 1

Hello chilly readers (unless you are reading from somewhere mild or even warm – I’m looking at you, Bajan views)!

26230858_10159772925135557_8132728713527503378_n

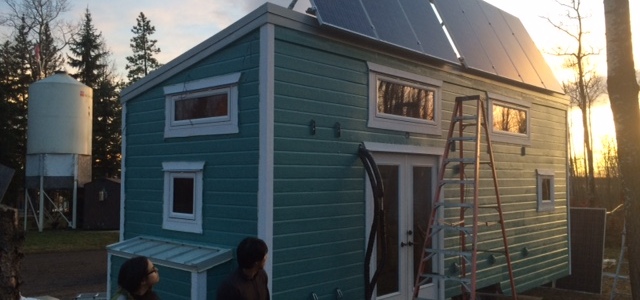
We’ve been living tiny since the end of March 2017, so we’re coming up on our first huge tiny anniversary! So since we are experienced greenhorns now, here is a tour of our experiences in the house over the last 10 months.

20170512_205206.jpg

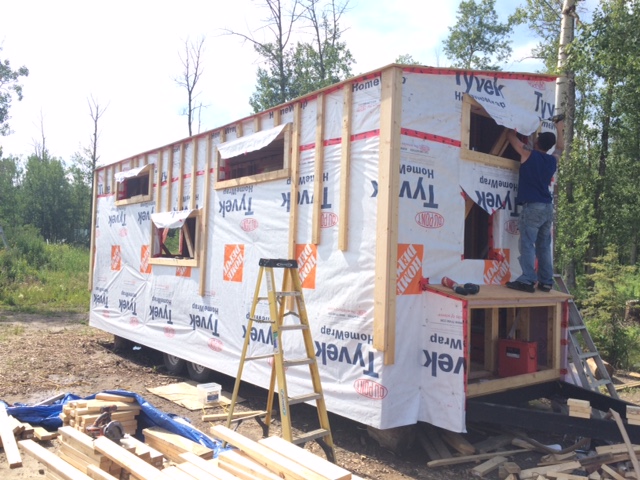
Spring: It was still pretty cold when we first moved in – it got below zero a few times. We mostly used our wood stove to heat for these months, and typically only needed to start a good fire and let it die out in our little Grizzly wood stove and that would heat us into the evening. No s’mores were had, but were often thought of. We didn’t fill our water in this time because we were waiting on finishing our shower basin (the wood barrel you see in the professional pictures) but for numerous reasons, it didn’t work out. In the meantime, we showered at the gym and filled big giant heavy stupid slippery but oh-so-useful glass jugs for drinking/cooking/dishes. The biggest problem with this season really was the water, but our propane was hooked up so we could heat water and food.

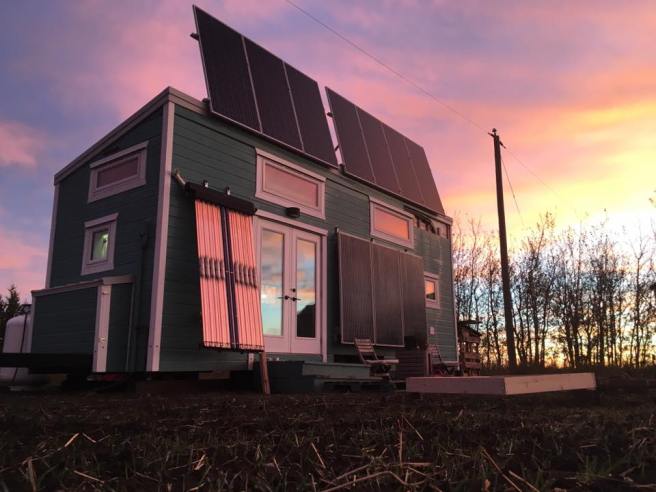
Summer: So, we were only here for the beginning of summer this year. Kenton had an opportunity to go to Barbados and work with an agro-preneur program to train young farmers to farm sustainably. We were gone to B.C. to visit my family for a month, and then off to Barbados for six weeks. The time in the summer we were home though, we learned some cool things about our house… The fan was a good idea. The cross breeze windows were a good idea. Ice cream is a good idea. Summer is the easiest time to live in our house since our solar panels are always maxing out out batteries, our solar collection tubes are always heating up our water, and there is no heating demand.

fall

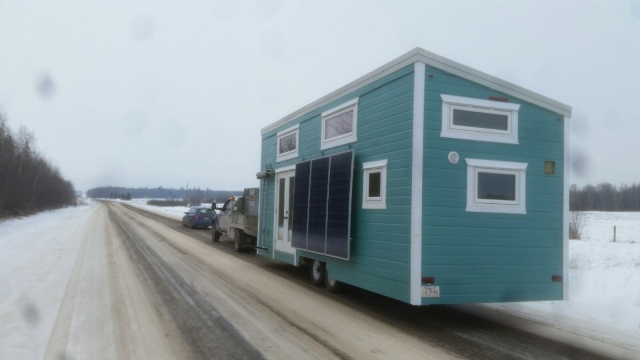
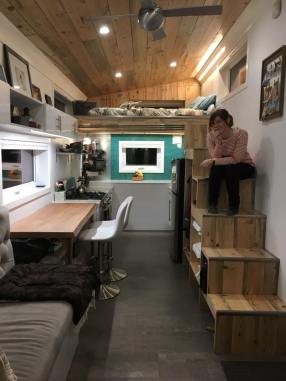
Fall: We moved the house a bit on the property we were on when we first got back from our trip, and we noticed a change in our wood stove. So it had been working OK in the spring, but now flooded our house with smoke about half the time. We started heating primarily with our back up system, a hot water loop heated by our combi-boiler (propane fuelled). That kept out house toasty and our heads thoroughly scratched wondering how we could fix up the wood stove and get our cozy dry heat back in. We bought and assembled a skirting kit to keep them breezes out from under our skirts, which we were hoping would keep a little heat in under the house. Our water tanks were filled and our shower was built so we can now… Shower at home! Goodbye, physical fitness!

IMG_20180109_175516_315.jpg

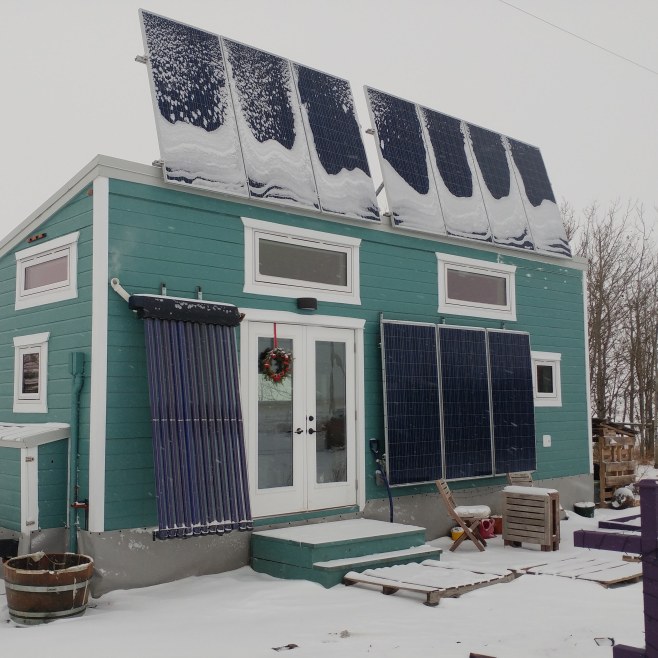
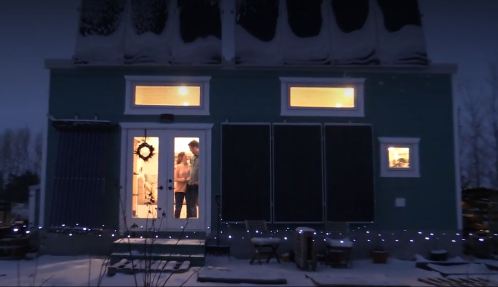
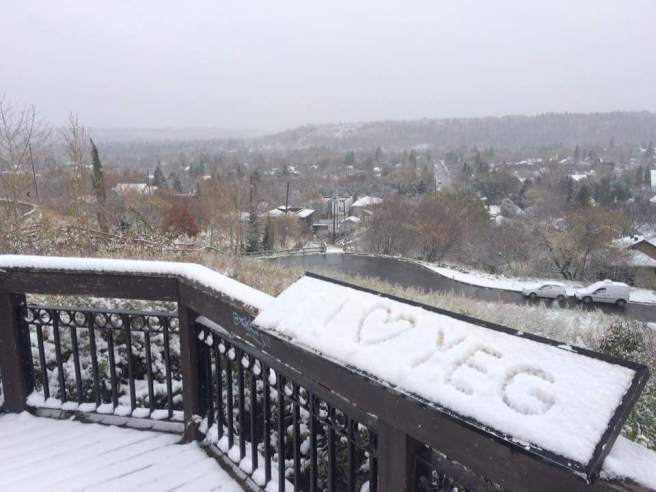
Winter: Since fall was a great Tuesday in September, winter came quickly for us. We still couldn’t figure out the wood stove, and it began to drip water so Kenton dismantled the piping and shut ‘er down for now. Check back in spring to see to see how our adjustments turn out. We are still on the hot water loop and that has kept the house from freezing which we tend to prefer. We have had two really cold snaps this year (around -35), so that kind of temperature swing has frozen our water pipes. Luckily they are PEX piping, so they didn’t burst when they froze. So, with a little bit of genius (also known as waiting around) our pipes thawed themselves the first time. The second time they froze, we stuck a heater under the house, and while Kenton was snooping around he found the likely culprit for the freezing – parts of the trailer frame exposed! So another thing to do for the spring/summer is a second coat of spray foam. Another fun thing in winter is that the sun isn’t around as long – and while I do appreciate getting to eat my gummy vitamin D supplements again (they are definitely made for adults, it’s a thing, you should get on this), I do not appreciate how badly our batteries are complaining. In the summer, we would typically get to “float” (optimum charge) to our batteries every day. Now, we are hoping for it once or twice a week. Also, the battery box is not heated, but has a wall shared with our bathroom that we did not insulate so some heat would leech in there. The box itself is insulated, but we have seen the batteries drop to zero once which made us a little uncomfortable – that’s when the batteries start to lose their capacity.

So that’s one giant update. Moving on… We were just in the news a couple times – check out our fancy media page – and we are planning to be featured in the Home and Garden show again this year so you guys can all come out and check us out.

EJTinyHouse

9 months later…

From our last post! Wait, what did you think 9 months was about?

Since we moved the house over to our friend’s garage… We finished it up in a completely exhausting whirlwind with the help of many fantastic people and got it ready in time for the Spring 2017 Home and Garden Show. We were up at 4am the night before the show started getting those final touches done so the house looked extra pretty.

show2
we, however, did not


As some of you know, the show was insane. I used a clicker at a medium-busy time and we guesstimate (who here hates that “word”?) that over 10,000 lovely folks walked through our house that weekend.

It was super neat meeting all you tiny house nerds at the show. By the end of the three days we had gotten our script down to an art and the answers to our most asked questions memorized.

My favourite person who went through the house was this one lady though, who upon stepping in said: “My garden shed is better designed than this.” I asked her why she thought so and she said, “Because at least it can hold a picnic table and a lawn mower.” I love it! Rest assured, our next tiny house we build will have a fold down picnic table and a hideaway lawn mower under the sink.

Here are some fancy pictures of our place (thanks Chris!) for us to collectively fawn over. Some minor changes have been made since we have been living in it for the last 9 months, but we’ll update you on all that later.


putting on the moves

Howdy and hello potential neighbours (no one can escape us now)!

We finally did it. We got hitched. To a truck.

Then we took this show on the road! Let’s talk about how this happens..

Since our house is oversized (9’5″ instead of the road legal 8’6″) we needed to get a permit. So here is how permitting works here in Alberta. So about 3 or 4 days before you want to haul your house, you gotta call up an agent and they honestly couldn’t care less what you’re hauling. Could be the pope, who cares! You really just need to give them the dimensions and the weight your axles can carry. They really mostly want to know about the truck. Who owns the truck, licence plate, insurance, what kind of truck, blah blah. Have all your truck fun fact sheets ready when you call them. We used a Dodge Ram 5500 borrowed from a friend who has to haul big ol’ tanks of fish to fill lakes. Neat right?! But I digress. So we moved our house from east of Sherwood park to west of St Albert, and that cost us an enormous, unheard of, obnoxious $35.

Then, we packed up all our stuff and folded the solar panels up against the house. The ones on the roof need to be folded down and slid to the back of the roof where the slope is lower. We measured the height of the house and it turns out to be 13’4″! So two Kentons. That means it is safe to take under the overpasses! Just like Kenton! Then we hitched it up to the truck that was going to carry all our hopes and dreams and massive amounts of anxiety.

prep

Once we hauled it out, it ran like a dream. The truck had no problem pulling the weight and it was smooth smooth sailing thanks to our fancy Timbren axles. We definitely had some stares on the highway – and uh, not to brag, but check us out:

haul

This brought us into the combine garage of a pal so we could work on it not in -32C with wind chill thank you thank you thank you! Seriously, thank you. We have made huge crazy leaps and bounds of progress since the move a few weeks ago so I’ll have to post you guys some updated pictures so you, too, can revel in its majesty.

Until our shared revelling…


Our House Guts (A.K.A. “Utilities”)

You and our house both have guts. Our house guts are just more complicated, but otherwise, same thing.

There are 4 systems to talk about – Electricity, water, waste, & heat.

1. Electricity. I’m going to start with this one. Cause its cool. Basically our entire south wall transforms into a solar capturing device. View it in all its glory in these 8 pictures.

This slideshow requires JavaScript.

Pictures are cool but a few of you reading this want to know the specs. Well here they are you data nerds!

-batteries: 8x Rolls Surrette 6 Volt batteries (48 volts and 468 amp hours)
-rated at 605 amp hours at C100 or 468 amp hours at C20
-inverter: 24 volt, 4000 Watt inverter, capable of producing 120 or 240 volts
-10x Canadian Solar 305 watt panels. CS6X-305P.

And here is educational lightning bolt diagram showing the journey of POWER.

flow-of-electrivity3correct

Solar energy is converted by the solar modules on the wall and roof into DC –> goes through a charge controller to charge our batteries–> then when we want power in the house, the inverter converts the energy in the batteries (DC) to AC–> then it goes to it’s usage points. Such as this beautiful super slim Lotus light we sourced from LED Lights Canada. 

The #1 comment we get is: “God, how much power do you need?! 10x panels? 8 batteries??” Edmonton, Alberta gets a heck of a lot of sunshine, but the fact of the matter is, if you get a week of cloud cover, do you want to live by candlelight? Our solar guru, Trevor Locke from NU Energy calculated our local solar data in conjunction with our daily usage, and we had just enough roof and wall to live the a solar powered life. (Including skipping using a dinosaur (propane) powered fridge.) Huge thanks also to Thomas Barr of NU Energy and Shaun Sommer who made it all come together.

2. Water. Taken for granted almost as much as power. Not us! Nope! We have 1803L of fresh water storage INSIDE our house! 🙂 1350L under one of our kitchen counters, and 453 under our living room couch. Lets take you through the water path!

This slideshow requires JavaScript.

Simple enough right? Well it gets complicated under the kitchen sink. Inside that cabinet we choose which water we want to use (tank 1, tank 2, or city water), then the water is pressurized, filtered, and splits up to go to its use points. One of the split cold water lines goes into a tank where it is heated up with a solar powered heat exchanger. Then that hot water goes to the combi-boiler where it will be heated up further if needed. Lastly, the hot water goes to sink, shower and washing machine. WHEW! (there is diagram coming up mapping this).

Huge thanks to George and Luke! Two very giving, knowledgeable plumbers who made all the impossible plumbing possible.

3. Which brings us to heat! Solar heated water is pretty cool… but wait till you hear how we heat our house! Basically we have 2 sources of heating. The first is a tiny little wood stove. Its literal model name is… THE GRIZZLY! This bad boy puts out 8-18K BTUs. Lucky for us though, we don’t need to rely on the wood heat. As soon as the temperature drops in the house, the thermostat tells the combi-boiler to kick on and it heats up a radiant loop that runs through baseboards and A TOWEL RACK! Yes sir, you heard that all caps correctly. We are an off grid tiny house with warm towels. Please enjoy this slow slideshow:

This slideshow requires JavaScript.

Pretty cool heating and water systems eh? We did a systems drawing to help us see, plan, and install everything correctly. See the picture below. Essentially you are looking at 3 separate lines – 1 glycol line for transferring solar energy to water (ST=Solar Thermal), 1 glycol line for distributing propane heat (Green), and then all the water lines (Blue and Red).

unnamed

4. Which brings us to waste! So this one is a touchy topic. One, because there are next to nil places in Alberta that have rules and policies in place for greywater. And, two, because there is a phobia of feces in our culture.

So let’s talk greywater first. Essentially, in most homes in the world there are two water pipes inside your house. White pipes carry potable water in, and black pipes, which carry water – and everything in it – away. Some places in the world are changing the game though and incorporating a grey pipe. These grey pipes are connected to sinks, washers, showers… essentially anything “safe” that they can take the still usable water so it can be treated and used again and/or dispersed to vegetation safety.

There are many fine print details to know around greywater. You need to treat it if it’s going to sit for any amount of time or else you start growing all sorts of things. Also, suddenly you need to take accountability for what you put down every drain… as you should anyways. Basically, now it’s your backyard, not your local waterway that takes it. So no more harsh chemicals! Your water often goes to your garden, yard and trees. And nobody wants Mr. Clean on their carrots.

So we have a greywater “system”. We built insulated trap door boxes that enclose our P-traps. (NOTE: Ptraps are those squiggly pieces of pipe under your sink. They hold a small amount of water stopping smelly air, bugs and rodents from coming back up your pipes).

After the water goes through our P-traps, it goes out to pivot pipes so we can disperse our greywater around our house and to garden beds.  Should we ever need to, we can install holding tanks for treating the water. I also installed emergency heat tape wrapped around the P traps and pivot pipes, so if they ever freeze we can thaw them.

But what about our poop right? Don’t worry, neither Mr. Clean or poop touch our carrots. We have a Natures Head Composting toilet. This way we have eliminated having any “black pipes” or sewage systems that we have to pump out. Now, before you get ideas in your head, these composting toilets have no smell, are easy to manage, and have nothing to do with outhouses! Trust me, or don’t, but there is no conversation more important than talking about what we do with our poop. The most adult and responsible thing we can do is fess up that there is nothing “sustainable” about migrating nutrients from the land, through our bowels and then into chemical treatment facilities and into the oceans.

Whew, things just got serious! I may or may not be super passionate about human accountability and changing human behavior. 🙂 Here is your greywater and toilet slideshow:

This slideshow requires JavaScript.

Well! That’s all you get for now for an overview! Honestly, there are many details I left out (some cool, some boring) and oh so many stories (some funny, some not). We will also have the “pretty” finished pictures of these systems in a post coming soon to an internet near you.

We will be super busy for the next month finishing the special projects and doing finishing in preparation for the show being showcased in the March 2017 Edmonton Home and Garden show! Maybe we shall see you there! If not, stay posted, as we have quite a few posts coming up, particularly on some of our super cool special projects.  🙂

baby steps: the outside and the inside

Getting the exterior painted was so clutch. Guys, we painted on the last warm day of fall. I think a lot of folks thought our siding was already painted, but it was only primed. We do not want our house “Ken Doll Beige” – not unless it also gets the 6 pack. We picked out the color with a fantastic interior designer, cat lover and pal, Rhonda Brynko from Precious Nest. She has been helping us out with all our “make this look good” needs! You should check her out because she will never tell you that something makes your house look fat.

Anyway we picked out this color:

cid_523
Churchill, because it felt presidential

Then we painted it with all our friendly friends in only light jackets! So unheard of.

As you can see, it turned out a little brighter than we thought – apparently we were supposed to water down the paint? Who knew! But we love it this happy and bright anyways so forget it.

Our friendly neighbourhood mechanic and brother-in-law Rob got our lights up. Now we are LIT guys. Is that what the kids are saying? It’s a positive thing right?

KitchenCraft met up with us and gave us some pretty designs of what our kitchen will look like! We made some minor tweaks with the design but come here and drool all over these. Not so pretty in the thumbnail, very pretty up close so feel free to click on these bad boys.


We also got the utilities finished up juuuust in time for the spray foam guys to get in there. We had ours done by Dependable Spray Foam Solutions. Their guy Micah was awesome to us and shuffled things around to make sure we got it done in time! We got the underside spray foamed in as well as the walls and roof with 3″ to give us an R value of 21 added onto our rigid foam on the outside. It also acts as a vapour barrier and seals up all our little cracks so our house is pretty sealed up. Now even in really cold weather (-32, anyone?) we can heat it up with a heater.

Here’s what spray foaming looks like (messy and pink):


After the spray foam, we started putting up our interior walls. On the long walls, we are using 1/2″ good one side plywood. We screwed those up and sank the screws, then filled everything with a wood filler called Plastic Wood. It squished into all the cracks and kind of went on like peanut butter. We sanded that down, and all the walls one last time to try and emulate a smooth surface, then paint white. The one wall there with the tank on it is going to be stained the same color as out exterior, it is made of maple just like all of us Canadians.

I also found a scary face.

20161203_141409
tiny house for sale: definitely not haunted

Um – anyway – now it’s time to paint the walls, get up our interior roof, and build our fancy custom furniture!

what we did last summer

Hello folks! OK, I know it’s been a while since I updated and I really should have and I’m very very sorry, so let’s all be in a very thanksgivingy, forgiving mood, and enjoy looking at all the pretty pictures of all the pretty progress we made!

Our siding is on. We got it through Monarch, and I gotta say, I am very impressed. They were really helpful people, and made sure we were getting the best product for the job. If you’re looking for siding and you don’t know what you’re looking for, (or if you do), I would recommend checking them out.

We settled on LP Smartside, which is a wood composite. It has a bunch of nifty features, like being really really incredibly strong (vs golf balls and rocks, according to their studies), DIY friendly, and not being incredibly heavy and crushing our trailer’s axles. Big thanks to Ryan Freeman too, for all his hard work on installation! I want to warn you that we haven’t painted the siding yet…

It comes pre-primed but now with the weather being unreasonable, our paint will chip and crack in these sub zero temperatures. Rats. We will have to wait until spring, or until we find an indoor space to finish up.

14601029_10157454140650567_4608305405658063512_n
but just as a friend

I’m sure you astute people noticed that we also have our solar gear on. We do!! Our amazing Trevor from NU Energy came out and helped us put on all the brackets he designed. We wouldn’t change the slope of our roof to be the best angle for the sun because we’re stubborn and he made it work! So that our house still sits within the 13’6″ height restriction, our solar panels will lay down on the roof below the highest point when travelling, and then we can slide them forwards and prop them up for capturing the rays of the sun and leaving the rest of the world in perpetual darkness.

We have been working hard on our utilities, because once they’re in, our house will have all its organs in order and we can spray foam it all in forever. So far our talented electrician friend Shaun has got half our wires run for electric, despite having just had a baby (!!!) and Sheldon installed our fancy metal roof despite having just had a baby (!!!). Sheldon brought such a cool, chill atmosphere to the site and he really knows his stuff. Check out his business, On Top Metals, in our sponsors section, cause he really came through for us and he has a cute new baby and I bet he’d show you pictures if you asked nicely.

Donat Carnegie is back helping us out with all our wood and painting projects. OK this man turned an old wine barrel into a friggin adorable bathtub/shower basin. I am not entirely convinced he isn’t a wizard. I am so in love with this thing, in the words of many wise teenage girls, I can’t even.


If any of you guys are interested in building a tiny house, or if you just want to be an uber nerd and learn everything about building one, Kenton is running a tiny house course in St Albert as a part of his army of permaculture workshops! It’s on June 24/25 next year. Check out his website to pick and choose or do them all to impress your friends and enemies.

See you guys soon when I have updates on the completion of our utilities, spray foaming and (gasp) the interior finishing!

windows, doors, and interiors, oh my!

OK troops, much to report so get comfy.

We have finished the rigid insulation (for cozy warmness) and the furring strips (for siding attachment). Let me tell you a thing about furring strips: boo. They took so long to put on, and it was irritating to try to figure out exactly where the framing was on the other side of the rigid insulation to screw through to – but it did use up a bunch of leftover wood and it looks kind of nifty.

IMG_6134
Ryan Freeman (from Freeman Tiny Homes) does something that looks important! also, furring strips half done.

Kenton and Ryan put in our windows and our door. Sorry, that didn’t accurately convey the proper feeling. Kenton and Ryan PUT IN OUR WINDOWS AND DOOR!! Closer. It looks and feels great. All our windows are operable, so it’s nice and breezy when you open them all up, and the double doors sometimes made us feel silly – we really had to fight to have the room for those bad boys – but they are a majestic beauty. Ryan apparently had to do quite a bit of wrestling to make sure the door went in straight, so we will have a championship belt to give him at the end of the build. We appreciated the suplex.

We threw on some housewrap! May have been redundant with spray foam but it is a good idea because it could keep air from passing through into our house through any cracks, and deter any wayward big bad wolves who may happen to huff and puff near our house. We wrapped it up good, and tuck taped all our holes and tuck taped the housewrap to the roof. No wind was getting in, not by the hair of our chinny chin chins.

Enough about the outside, what really counts is what’s on the inside, right?

We were having trouble figuring out how to mount the 4x4s that will hold up our lofts. Normally, the joists would rest on top of 2x4s that would nestle up against the wall framing. The issue was this: the framing on the opposite wall didnt match, and also there was a window and supporting studs the way that would prevent that from happening anyways. Here was our solution: we will screw in a beetlekill 2×4 (for prettiness) up against our walls, running parallel to the ground, and then put the 4x4s on top of that. Well, it worked out perfectly.

IMG_6113
some would say it worked out picture perfectly

A big thank you to Beetlewood Industries for sending us some really beautiful pieces of wood – you can really see all that pretty pretty blue grey that this particular pine is known for. While I’m mentioning seeing beautiful details in wood, thank you also to the hard working Donat Carnegie for informing our decision on a finish (not a stain) for the wood, which really kept the soft pastel feel we were hoping to preserve.

We threw some plywood scraps up there so we could sit and feel it out. Let me tell you how it feels: good. Both of us can sit in there without banging our heads on the roof, and can make it to the short end without army crawling so we’ll call that a win.

IMG_6118
our ‘playing it cool’ faces

We also got in our water tanks. There will be two water tanks for fresh water storage – one in the kitchen and one in the couch. The kitchen one is JUST too tall for a regular countertop for my regular-heighted self, although 6’4″ Kenton will tell  you it would have been fine. Mm-hm. So we will have one tall counter for the Mr. (otherwise known as storage counter), and the others will be a more reasonable height for the Mrs (otherwise known as actual food prep areas for normal people).

13729094_10157057091965567_1378369876487032767_n
regular person and giant in tiny house

We moved our appliances into the kitchen to get a feel for how the space will do for walking around each other and to get the gears turning for how we want our kitchen cabinets arranged. We’re in talks with KitchenCraft on how to make the most of our space and the possibilities right now seem really exciting!

Next we will be installing our metal roofing, siding, mounting our solar panels and solar hot water heating systems. From the outside, our house will look finished!

It always sounds so simple when you can say it in one sentence.

the shell

Any hermit crab would be jealous of the shell we are making here. Here’s the update!

We have finished putting on all the hurricane ties and structural strapping, so our walls should be pretty solid if we ever move this bad boy (or girl, it’s 2016 after all) or get a big storm or something. Kenton and Jeff spent a day doing that, plywooding the rafters, and getting the battery box built.

Then we glued a bunch of rigid insulation over our beautiful skeleton to hide dem bones. And that roof. Thanks to Dave (who I hear is a daredevil with heights) and Ryan for coming out to help us out. Wall of famers. Once we have walls.

Now that there’s the rigid on the roof, we have it all tuck taped (hit the road, duct tape) so that it’s a water barrier. We officially have some kind of structure that actually shelters us if it were to rain! Remember that we’re going to spray foam in behind the rigid insulation when it’s all done, and that will close any gaps we might have behind the tape, and give us the majority of our R value.

Each step now feels like we’re building towards something, even if it’s a tiny something.

ladies and gentlemen: walls.

Now that our trailer is all dressed up and ready for prom (thanks for the joke, Mom), we BUILT OUR WALLS. Kind of. Partly. Expect this blog to have more entries as our build picks up.

Our framing is (mostly) done. Behold it before I explain it.

IMG_5898
gasp! wonder! awe!

You can absolutely learn to frame your house by yourself. I mean, you can teach yourself all the Latin names for every species of frogs, too. The internet is a magical place. Our friends Aimee and Matt came up with their own tiny house framing plan using brainpower and graph paper, so it is definitely possible. For us, we hired Jeff Cuddeback. He was a life saver. He sped up the actual putting things together part, and also did a lot of problem solving. It would have taken us twice as long, easily, to do his work. We like Jeff. If  you want to hire someone for framing, we think you should hire him.

We started by putting in our floor. Here is our floor. It’s very floor-y.

Some stuff to note about our not-as-exciting-as-walls floor… We put our subfloor directly onto our trailer frame. We glued this down with PL glue and exactly one million screws. Our buddy Steve helped us out and did a lot of annoying drilling into steel to make room for those screws. Anyway, normally a floor would have framing underneath it to hold your insulation. Since we are going to use spray foam, we are saving a 3.5 inches or so by tossing out that framing and just spray foaming the trailer underneath. Apparently, there is a coating you can spray over the foam to make sure it won’t be damaged by rocks and stuff when we move the house – the same thing they use under trucks. We are planning currently to put cork flooring directly on top of that, so our floor is going to be very minimal.

I’ll give it to you straight – our framing plan wasn’t perfect. OK, we didn’t exactly have a framing plan. We had all our lumber and stuff dropped off at the build site, and we printed off our sketch-up drawings solar Trevor (our only Trevor now, there can be only one), and we brought them out and gave them to Jeff.

But our windows weren’t drawn to the right size (our order was adjusted so our windows were regular manufacturing thus saving us the money we would spend on customizing our windows). Jeff is wonderful, figured it out and made the adjustments based on our actual window order.

Finally, we decided to pull the whole kitchen wall out instead of building a box for one of our storage tanks on that side. It seemed a little silly to build the box when we could be making our bedroom loft bigger and our framing easier. Since the water tank still has to go there, it’s going to give us a C shaped kitchen now, with the tank area on the end three inches higher than a normal countertop. With super technical experiments run in our kitchen, I have T-Rex arms when I try to chop 3 inches higher. So, the other countertops will stay the regular height (unless Kenton can convince me otherwise – good luck).

13419009_10156988905740557_53813818729655574_n
what a bunch of weirdos

Kenton ran a tiny house workshop a couple days later, and the participants jumped in and helped out attaching hurricane ties and structural strapping! This is to make sure our house doesn’t get pulled apart from the wracking forces of moving the house anywhere and not for actual hurricanes, but I will feel a little more confident in Kansas after this.


hopefully the last post about our trailer

All the welding on the trailer is now done. Only a few more things to do and we have a fully built momma-lovin trailer!

Here is our new design (drawn by the lovely Kenton Zerbin):

20160424_161255

Let me break it down for you. The outside supports and extensions remain the same, but we added a few things.

  1. The hitch is longer. We upped the length of the hitch from the frame by quite a bit – from 5 feet to 7 feet. This will give us a swanky spot to put our battery box and our propane tanks. Most importantly though, it will increase the turning radius of the trailer when someone with a giant truck hauls it. You have to size your hitch to the back of the biggest truck that will haul it, so that the wideness of the  back of the truck fits along the triangle of the hitch, otherwise it will hit your house when it makes a sharp turn.
  2. It is beefier. Before it was built out of what looks like sheet metal bent to look like C channel, so that’s real cute. It will be nice to have it stronger in case something hits it or it hits a tree or something. I don’t know, these things don’t happen to us. Also they seem to have done a repair job or something in the back, because they jammed a piece of wood in there that caught fire a few times while we were welding. So… That was a weird thing to do.
  3. This time it was made with LOVE! … and a little bit of hate. Stupid tree should have grown about 3 feet to the east.


Here is what it looks like now:

20160424_114453

Next steps… Get on the wheel wells (Kenton’s friend from high school, Robert, built the hitch AND the wheel wells for us.), get rid of the rust, silicone all our seams (to keep water from sitting inside it and rusting), and then slap some paint on it!

If we were to do it all again:

We would still get our axles from Timbren. They withstood the accident like a champion – they drove the trailer back smooth as butter even though it was all bent up and made our souls cry. Everyone who has seen them or driven the trailer with them on has complimented the system. It rules.

We would NOT buy another used trailer and try to make it fit our plans. It was a big hassle to try to bend the pieces back to square, a bigger hassle to add on strong well designed elements to a flimsy frame, and the biggest hassle of all to rebuild when it ultimately failed us. We have literally replaced the whole trailer at this point. We would probably recommend that people think through a plan, draw it out, and bring it to a fabricator. This way, they could build it in the shop (which has a lot less to worry about for leveling, squaring, etc) in a lot less time, exactly how it should be and with the strength you are looking for.

OK. Breathe.

Bring on the walls! I am so ready for the walls.